
| 일 | 월 | 화 | 수 | 목 | 금 | 토 |
|---|---|---|---|---|---|---|
| 1 | 2 | 3 | 4 | 5 | 6 | 7 |
| 8 | 9 | 10 | 11 | 12 | 13 | 14 |
| 15 | 16 | 17 | 18 | 19 | 20 | 21 |
| 22 | 23 | 24 | 25 | 26 | 27 | 28 |
| 29 | 30 |
- 스프링 스케쥴러
- 다리를 지나는 트럭
- kubenetes
- @configuration
- H-index
- @Data
- 쿠버네티스
- K번째수
- 전화번호 목록
- 모던 자바 인 액션
- @Getter
- 검색 기능 확장
- 알고리즘
- 커링
- 프로그래머스
- 정렬
- 크론 표현식
- 롬복 어노테이션
- 완주하지 못한 선수
- 기능개발
- 스택/큐
- @Setter
- Java
- 코딩 테스트
- 해시
- @EnableScheduling
- 고차원 함수
- 루씬 인 액션
- 가장 큰 수
- 영속 자료구조
- Today
- Total
Today I Learned
컴포넌트 기초 본문
컴포넌트의 장점
- 뛰어난 재사용성 - 반복되는 UI와 기능을 컴포넌트로 작성해서 재사용 가능
- 테스트 용이 - 컴포넌트 단위의 기능 테스트 가능. Karma, Mocha, Jest 등의 테스트 도구 사용 가능
- 편리한 디버깅 - 컴포넌트 단위로 전달된 속성 및 부모 컴포넌트로 전달된 이벤트 정보 파악 가능
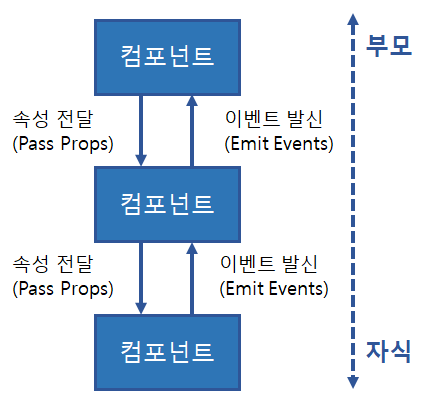
컴포넌트 조합
Vue.js는 컴포넌트들을 조합해 전체 애플리케이션을 작성
컴포넌트는 부조-자식 관계로 트리구조를 형성하며, 부모 컴포넌트가 자식 컴포넌트를 포함하는 형태
데이터 전달 방향은 주로 부모 → 자식 컴포넌트 (단방향)
* 양방향 데이터 전달도 가능하지만 애플리케이션 복잡도가 높아지고 유지보수에 어려움이 있어 권장X

부모 컴포넌트는 자식 컴포넌트로 속성을 전달 / 자식컴포넌트를 부모컴포넌트로 이벤트를 발신
자식 컴포넌트에서 사용자 정의 이벤트를 정의하고 이벤트를 발생시키면 부모 컴포넌트에서 이벤트 핸들러 메서드를 호출하도록 작성
* 컴포넌트에서 data 옵션을 사용할 경우 반드시 함수로 작성하고 함수 내부에서 객체를 리턴하도록 해야함
단순한 객체 값으로 작성하는 경우 객체가 참조형 값이므로 모두 동일한 값을 참조하게 됨
컴포넌트의 작성
Vue.component(tagname, options)
tagname : 컴포넌트를 사용할 태그명
options : 컴포넌트에서 렌더링할 templet 등을 지정
<body>
    <script type="text/javascript">
        Vue.component('hello-component', {
            template: '<div>hello world!!!</div>' <!--인라인 템플릿 방식-->
        })
    </script>
    <div id="app">
        <hello-component></hello-component>
        <hello-component></hello-component>
        <hello-component></hello-component>
    </div>
    <script type="text/javascript">
        var v = new Vue({
            el: '#app'
        })
    </script>
</body>
작성된 컴포넌트를 사용할 때는 등록한 태그명을 사용
template 옵션에 템플릿 문자열을 사용하는 방식을 인라인 템플릿이라 함

live-server라는 도구를 사용하면 핫리로딩(Hot Reloading)이라는 기능을 통해 코드가 변경되어 저장되면 브라우저 화면에 즉시 갱신하도록 할 수 있음
크롬 개발자도구의 Vue 탭을 열어 컴포넌트의 계층 구조를 확인 가능
DOM 템플릿 구문 작성 시 주의 사항
HTML 요소들은 자식 요소로 포함시킬 수 있는 요소들이 정해져 있는 경우가 있고, 이 사항을 브라우저가 구문 분석을 수행. 이러한 경우에 Vue 컴포넌트가 사용되면 때때로 오류가 발생하기도 함
<script type="text/javascript">
    Vue.component('option-component', {
        template: '<option>hello</option>'
    })
</script>

<body>
    <div id="app">
        <select>
            <!--실행화면에서는 해당 코드가 렌더링 X-->
            <option-component></option-component>
            <option-component></option-component>
        </select>
    </div>
</body>
<script type="text/javascript">
    var v = new Vue({
        el: '#app'
    })
</script>
코드 상에서 <select> 태그 안에 <option-component></option-component>를 작성했지만 실행화면에서는 <option>이 렌더링되지 않음
브라우저가 태그들을 구문분석하는 단계에서 DOM 요소가 올바르지 않다고 판단하기 때문에, Vue 컴포넌트 렌더링이 실패
이 문제를 해결하기 위해 is 특성(Attribute)를 이용
    <div id="app">
        <select>
          <option is="option-component"></option>
          <option is="option-component"></option>
      </select>
    </div>
또는 <script type="text/x-template"> 태그 안에서 코드를 작성
<script type="text/javascript">
    Vue.component('option-component', {
        template: '<option>hello</option>'
    })
</script>
<script type="text/x-template" id="selectTemplate">
    <select>
      <option-component></option-component>
      <option-component></option-component>
   </select>
</script>
<script type="text/javascript">
    Vue.component('select-component', {
        template: '#selectTemplate'
    })
</script>
* 템플릿 문자열 안에서 루트 요소(Root Element)는 하나여야함
<!--<div> 요소가 여러개여서 정상적으로 렌더링 X -->
<template id="helloTemplate">
  <div>hello</div>
  <div>world</div>
</template>


<!--<div> 요소로 한번 더 감싸 루트 요소가 하나가 되어서 정상 렌더링 -->
<template id="helloTemplate">
  <div>
    <div>hello</div>
    <div>world</div>
  </div>
</template>
컴포넌트에서의 data 옵션
컴포넌트 내부의 로컬 상태 정보를 저장하기 위해 data 옵션을 사용할 수 있음
하지만 data 옵션에 객체를 직접 지정하면 컴포넌트가 정상적으로 렌더링되지 않고 오류 발생
<template id='timeTemplate'>
  <div>
      <span>{{nowTS}}</span>
      <button v-on:click="timeClick">현재 시간</button>
  </div>
</template>
<script type="text/javascript">
    Vue.component('time-component', {
        template: '#timeTemplate',
        <!--data 옵션 값으로 인해 오류가 발생-->
        data: {
            nowTS: 0
        },
        methods: {
            timeClick: function(e) {
                this.nowTS = (new Date()).getTime();
            }
        }
    })
</script>


<body>
    <div id="app">
        <time-component></time-component>
        <time-component></time-component>
    </div>
    <script type="text/javascript">
        var v = new Vue({
            el: '#app'
        })
    </script>
</body>
time-component의 data 옵션 값으로 인해 오류가 발생
정상적으로 렌더링되려면 data 옵션에 함수가 주어져야 함 ( 함수가 호출되어 리턴된 객체가 data 옵션에 주어진다 )
data 옵션값을 다음과 같이 변경하면 정상적으로 작동
data: function() {
    return {
        nowTS: 0
    }
},
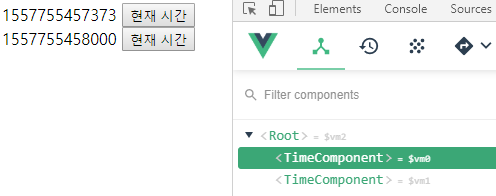
data 옵션에 함수를 지정하면 동일한 컴포넌트가 여러 번 사용되더라고 동일한 객체를 가리키는 것이 아니라 함수가 호출될 때마다 만들어진 객체가 리턴 → 서로다른 객체를 참조하게 됨
props와 event
Vue 컴포넌트들이 부모-자식 관계로 형성되었을 때 각 컴포넌트 내부의 데이터는 캡슐화되기 때문에 다른 컴포넌트나 앱에서 접근할 수 없음.
부모 컴포넌트 → 자식 컴포넌트로 데이터 전달은 속성(props)를 이용
자식 컴포넌트 → 부모 컴포넌트로 데이터 전달은 이벤트(event)를 이용
props를 이용한 정보 전달
Vue 컴포넌트를 정의할 때 props 옵션을 작성하고 props명을 배열로 나열
<template id="listTemplate">
	<!--여기서 템플릿 문자열을 통해 출력-->
    <li>{{myMessage}}</li>
</template>
<script type="text/javascript">
    Vue.component('list-component', {
        template: '#listTemplate',
        <!--message라는 이름의 속성을 정의-->
        props: ['myMessage']
    })
</script>

<body>
    <div id="app">
        <ul>
            <!--컴포넌트를 사용할때 특성(attribute)처럼 전달-->
            <!--컴포넌트를 사용하는 태그에서는 케밥 표기법으로 속성명을 표기해야함-->
            <list-component my-message="Hello"></list-component>
            <list-component my-message="씬짜오"></list-component>
            <list-component my-message="니하오마"></list-component>
        </ul>
    </div>
</body>
<script type="text/javascript">
    var vm = new Vue({
        el: "#app"
    })
</script>
list-component 컴포넌트를 작성하면서 message라는 이름의 속성을 정의
이 속성을 통해 전달된 정보는 템플릿 문자열을 통해 출력
속성을 통해 정보를 전달하기 위해서는 컴포넌트를 사용할 때 특성(Attribute)처럼 전달
* 컴포넌트 작성 시 속성명을 부여할 때는 카멜 표기법(camel casing)을 사용했다면 태그에서 속성명을 사용할 정보를 전달할 때는 반드시 케밥 표기법(kebob casing)을 사용해야함. 태그 작성 시 특성(Attribute)는 대소문자를 구분하지 않기 때문
<template id="listTemplate">
    <li>{{message}}</li>
</template>
<script type="text/javascript">
    Vue.component('list-component', {
        template: '#listTemplate',
        <!--배열 형식이 아닌 객체 형식으로 속성 정의-->
        props: {
            message: {
                type: String,
                default: '안녕하세요' <!--기본값-->
            },
            count: {
                type: Number,
                required: true <!--필수입력값-->
            }
        }
    })
</script>

<body>
    <div id="app">
        <ul>
            <list-component message="Hello" count="100"></list-component> <!--리터럴로 속성을 전달하면 문자열 값 그대로 전송-->
            <list-component message="씬짜오" v-bind:count="21"></list-component> <!--v-bind 디렉티브를 이용하면 숫자로 전송 가능-->
            <list-component message="니하오마"></list-component> <!-- count값이 없어서 warn 발생-->
            <list-component :count="1000"></list-component> <!--v-bind의 축약표현인 : 사용 -->
        </ul>
    </div>
</body>
<script type="text/javascript">
    var vm = new Vue({
        el: "#app"
    })
</script>
1번째 list-component처럼 리터럴로 속성을 전달하면 문자열 값 그대로 전달
2번째 list-component처럼 v-bind 디렉티브를 사용해서 해결 가능
3번째 list-component에 필수값인 count가 없어서 warn 발생
속성으로 전달할 값이 배열이나 객체인 경우, 기본값(default value)을 부여하려면 반드시 함수를 사용해야함
<template id="listTemplate">
    <li>{{message}}</li>
</template>
<script type="text/javascript">
    Vue.component('list-component', {
        template: '#listTemplate',
        props: {
            message: {
                type: String,
                default: '안녕하세요'
            },
            count: {
                type: Number,
                required: true
            },
            countries: {
                type: Array,
                <!--배열이나 객체의 기본값을 부여할 때는 함수의 리턴값으로 처리-->
                default: function() {
                    return ['대한민국'];
                }
            }
        }
    })
</script>

<body>
    <div id="app">
        <ul>
            <list-component message="Hello" v-bind:count="100" v-bind:countries="['미국', '영국', '호주']"></list-component>
            <list-component message="씬짜오" :count="21" :countries="['베트남']"></list-component>
            <list-component message="니하오마" :countries="['중국', '타이완']"></list-component>
            <list-component v-bind:count="1000"></list-component>
        </ul>
    </div>
</body>
<script type="text/javascript">
    var vm = new Vue({
        el: "#app"
    })
</script>
속성을 통한 배열 데이터 출력 예제
<style>
    #list {
        width: 600px;
        border: 1px solid black;
        border-collapse: collapse;
    }

    #list td,
    #list th {
        border: 1px solid black;
        text-align: center;
    }

    #list>thead>tr {
        color: yellow;
        background-color: purple;
    }
</style>
<template id="listTemplate">
    <div>
    <table id="list">
        <thead>
            <tr>
                <th>번호</th><th>이름</th><th>전화번호</th><th>주소</th>
            </tr>
        </thead>
        <tbody id="contacts" >
            <tr v-for="contact in contacts">
                <td>{{contact.no}}</td>
                <td>{{contact.name}}</td>
                <td>{{contact.tel}}</td>
                <td>{{contact.address}}</td>
            </tr>
        </tbody>
    </table>
    </div>
</template>
<script type="text/javascript">
    Vue.component('contactlist-component', {
        template: '#listTemplate',
        props: ['contacts']
    })
</script>
<!--여기까지가 하나의 컴포넌트-->

<body>
    <div id="app">
        <h1>예방 접종</h1>
        <hr />
        <h3>1차 대상자 : 5월 1~3일</h3>
        <contactlist-component :contacts="list1"></contactlist-component>
        <h3>2차 대상자 : 5월 13~15일</h3>
        <contactlist-component :contacts="list2"></contactlist-component>
    </div>
</body>
<script type="text/javascript">
    var vm = new Vue({
        el: "#app",
        data: {
            list1: [{
                "no": 97,
                "name": "Kalisa Rogers",
                "tel": "010-3456-8296",
                "address": "서울시"
            }, {
                "no": 96,
                "name": "Jesse James",
                "tel": "010-3456-8295",
                "address": "서울시"
            }, {
                "no": 95,
                "name": "Jennifer Walker",
                "tel": "010-3456-8294",
                "address": "서울시"
            }],
            list2: [{
                "no": 82,
                "name": "Zenon Howard",
                "tel": "010-3456-8281",
                "address": "서울시"
            }, {
                "no": 81,
                "name": "Kylie Allen",
                "tel": "010-3456-8280",
                "address": "서울시"
            }]
        }
    })
</script>
event를 이용한 정보 전달
event를 이용해서 전달하는 방법은 사용자 정의 이벤트를 활용
자식 컴포넌트에서는 이벤트를 발신(emit) / 부모 컴포넌트에서는 v-on 디렉티브를 이용해 이벤트를 수신
<!-- child Component 시작 -->
<style>
    .buttonstyle {
        width: 120px;
        height: 30px;
        text-align: center;
    }
</style>
<template id="childTemplate">
    <div>
        <button class="buttonstyle" v-on:click="clickEvent"
            v-bind:data-lang="buttonInfo.value">{{ buttonInfo.text }}</button>
    </div>
</template>
<script type="text/javascript">
    Vue.component('child-component', {
        template: '#childTemplate',
        props: ['buttonInfo'],
        methods: {
            clickEvent: function(e) {
                this.$emit('timeclick', e.target.innerText, e.target.dataset.lang);
            }
        }
    })
</script>
<!-- child Component 끝 -->
<!-- parent Component 시작 -->
<template id="parent-template">
    <div>
        <child-component v-for="s in buttons" v-bind:button-info="s"
            v-on:timeclick="timeclickEvent">
        </child-component>
        <hr />
        <div>{{ msg }}</div>
    </div>
</template>
<script type="text/javascript">
    Vue.component('parent-component', {
        template: '#parent-template',
        props: ['buttons'],
        data: function() {
            return {
                msg: ""
            };
        },
        methods: {
            timeclickEvent: function(k, v) {
                this.msg = k + ", " + v;
            }
        }
    })
</script>
<!-- parent Component 끝 -->

<body>
    <div id="app">
        <parent-component :buttons="buttons"></parent-component>
    </div>
</body>
<script type="text/javascript">
    var vm = new Vue({
        el: "#app",
        data: {
            buttons: [{
                text: "Hello",
                value: "영어"
            }, {
                text: "씬짜오",
                value: "베트남어"
            }, {
                text: "니하오",
                value: "중국어"
            }]
        }
    })
</script>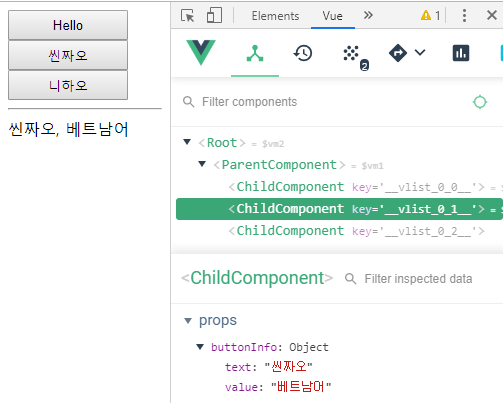

자식 컴포넌트에서는 buttonInfo 속성을 정의한다. 이 속성은 부모 컴포넌트에서 값을 전달받으며, 전달받은 값을 이용해서 버튼 리스트를 생성한다.
부모 컴포넌트는 buttons 속성과 msg 데이터 옵션을 포함하고 있다. 데이터 옵션은 해당 컴포넌트 내에서만 사용하기 위해 정의한다. buttons 속성은 vm Vue 인스턴스의 buttons 데이터를 전달받아 v-for 디렉티브를 사용해 반복적으로 생성되는 자식 컴포넌트에 각각의 배열값을 바인딩한다.
자식 컴포넌트 내부에서 버튼이 클릭되면 $emit() 메서드를 이용해 timeclick 이벤트를 발신
부모 컴포넌트에서는 v-on 디렉티브를 이용해 timeclick 이벤트를 처리
props와 event 예제
연락처 조회 기능을 제공하는 예제의 컴포넌트화
<!DOCTYPE html>
<html>

<head>
    <meta charset="utf-8">
    <title>06-23</title>
    <script src="https://unpkg.com/vue@2.5.16/dist/vue.js"></script>
    <script src="https://cdn.jsdelivr.net/npm/lodash@4.17.10/lodash.min.js"></script>
    </script>
    <script src="https://cdnjs.cloudflare.com/ajax/libs/fetch/2.0.4/fetch.js"></script>
    <script src="https://cdnjs.cloudflare.com/ajax/libs/es6-promise/4.1.1/es6-promise.auto.min.js"></script>
</head>
<!-- contactlist-component 시작 -->
<style>
    #list {
        width: 600px;
        border: 1px solid black;
        border-collapse: collapse;
    }

    #list td,
    #list th {
        border: 1px solid black;
        text-align: center;
    }

    #list>thead>tr {
        color: yellow;
        background-color: purple;
    }
</style>
<template id="listTemplate">
    <div>
    <table id="list">
        <thead>
            <tr>
                <th>번호</th><th>이름</th><th>전화번호</th><th>주소</th>
            </tr>
        </thead>
        <tbody id="contacts" >
            <tr v-for="contact in contacts">
                <td>{{contact.no}}</td>
                <td>{{contact.name}}</td>
                <td>{{contact.tel}}</td>
                <td>{{contact.address}}</td>
            </tr>
        </tbody>
    </table>
    </div>
</template>
<script type="text/javascript">
    Vue.component('contactlist-component', {
        template: '#listTemplate',
        props: ['contacts']
    })
</script>
<!-- contactlist-component 끝 -->
<!-- search-component 시작 -->
<template id="searchTemplate">
    <p>
        이름 : <input type="text" v-model.trim="name" :placeholder="placeholder"
                @keyup.enter="keyupEvent" />
    </p>
</template>

<script type="text/javascript">
    Vue.component('search-component', {
        template: '#searchTemplate',
        props: ['placeholder'],
        data: function() {
            return {
                name: ''
            };
        },
        methods: {
            keyupEvent: function(e) {
                var val = e.target.value;
                <!-- 입력된 글자가 2자 이상일때 이벤트 발신 -->
                if (val.length >= 2) {
                    this.$emit('search', val);
                } else {
                    this.$emit('search', '');
                }
            }
        }
    })
</script>
<!-- search-component 끝 -->
<!-- searchcontact-component 시작 -->
<template id="searchcontactTemplate">
    <div>
        <!-- v-on 디렉티브로 search-component의 search 이벤트 수신 -->
        <search-component placeholder="두글자 이상 입력후 엔터!" v-on:search="searchEvent"></search-component>
        <contactlist-component v-bind:contacts="contactlist"></contactlist-component>
        <div v-show="isProcessing === true">조회중</div>
    </div>
</template>
<script type="text/javascript">
    Vue.component('search-contact-component', {
        template: '#searchcontactTemplate',
        data: function() {
            return {
                contactlist: [],
                isProcessing: false
            }
        },
        methods: {
            <!-- search 이벤트에 의해 호출되며, name 값을 fetchContacts 메서드로 전달 -->
            searchEvent: function(name) {
                if (name == '')
                    this.contactlist = [];
                else
                    this.fetchContacts(name);
            },
            fetchContacts: _.debounce(function(name) {
                this.contactlist = [];
                this.isProcessing = true;
                var url = "http://sample.bmaster.kro.kr/contacts_long/search/" + name;
                var vm = this;
                fetch(url)
                    .then(function(response) {
                        return response.json()
                    }).then(function(json) {
                        vm.contactlist = json;
                        vm.isProcessing = false;
                    }).catch(function(ex) {
                        console.log('parsing failed', ex);
                        vm.contactlist = [];
                        vm.isProcessing = false;
                    })

            }, 300)
        }
    })
</script>
<!-- searchcontact-component 끝 -->

<body>
    <div id="app">
        <search-contact-component></search-contact-component>
    </div>
</body>
<script type="text/javascript">
    var vm = new Vue({
        el: "#app"
    })
</script>

</html>

① search-component에서 keyup 이벤트가 발생하면 search-contact-component로 이벤트를 발신
② 이때 텍스트 박스에 입력된 문자열을 인자로 담아 부모 컴포넌트로 전달
③ 전달받은 데이터를 이용해 연락처 서비스 API에 요청하여 이름이 포함된 연락처 목록을 받아옴
④ 받아온 연락처 목록은 부모 컴포넌트(search-contact-component)의 내부 상태로서 contactlist 데이터 옵션에 저장
⑤ 저장된 값을 conacts 속성(props)를 통해 contactlist-component 컴포넌트로 전달
이벤트 버스 객체를 이용한 통신
부모-자식 관계가 아닌 컴포넌트들 사이의 정보전달은 이벤트 버스(Event Bus) 객체를 사용
<!-- 이벤트 버스 객체 -->
<script type="text/javascript">
    var eventBus = new Vue();
</script>
<!-- 첫번째 자식 컴포넌트 시작-->
<template id="chidl1Template">
    <div>
        <button v-on:click="clickEvent">child1 button!!</button>
        <div>{{currentTime}}</div>
    </div>
</template>
<script type="text/javascript">
    Vue.component('child1-component', {
        template: '#chidl1Template',
        data: function() {
            return {
                currentTime: ''
            };
        },
        methods: {
            clickEvent: function() {
                var d = new Date();
                var t = d.toLocaleTimeString() + " " + d.getMilliseconds() + "ms";
                eventBus.$emit('click1', t);
                this.currentTime = t;
            }
        }
    });
</script>
<!-- 첫번째 자식 컴포넌트 끝-->
<!-- 두번째 자식 컴포넌트 시작-->
<template id="chidl2Template">
    <ul>
        <li v-for="t in timelist">{{t}}</li>
    </ul>
</template>
<script type="text/javascript">
    Vue.component('child2-component', {
        template: '#chidl2Template',
        data: function() {
            return {
                timelist: []
            };
        },
        created: function() {
            eventBus.$on('click1', this.child1Click);
        },
        methods: {
            child1Click: function(time) {
                this.timelist.push(time);
            }
        }
    });
</script>
<!-- 두번째 자식 컴포넌트 끝-->

<body>
    <div id="app">
        <child1-component></child1-component>
        <hr />
        <child2-component></child2-component>
    </div>
</body>
<script type="text/javascript">
    var vm = new Vue({
        el: "#app"
    })
</script>

이벤트를 수신하는 컴포넌트는 미리 이벤트 핸들러를 등록해야함. 이를 위해 Vue 인스턴스의 생명주기의 created 이벤트 훅을 이용하여 Vue 인스턴스가 만들어질 때 $on 메서드를 사용해 이벤트 수신 정보를 등록.
이벤트를 발신하는 컴포넌트에서는 $emit 메서드를 호출
'Vue.js' 카테고리의 다른 글
| Vue-CLI 도구 (0) | 2019.06.14 |
|---|---|
| ECMAScript 2015 (0) | 2019.06.02 |
| 스타일 (0) | 2019.05.06 |
| 이벤트 처리 (0) | 2019.05.01 |
| Vue 인스턴스 (0) | 2019.04.25 |


